

Data Structures 101: Graph Traversal - BFS & DFS
A simple and visual guide for you to understand Graph Traversal using DFS and BFS


✨ Introduction
Breadth First Search AKA BFS and Depth First Search AKA DFS are two graph searching algorithms. There are many other searching algorithms as well but these two are the simplest ones.
If you have studied the Tree data structure ever before, you will probably be familiar with these two algorithms. Since the tree is also a form of a graph, I decided to cover these two topics before trees.
When we will cover the tree data structure, this topic will be a review then. Also, we will learn the differences between graph DFS/BFS and Trees BFS/DFS.
"In both DFS and BFS, we visit individual nodes one by one until we find the node which we were looking for."
✨ Depth First Search (DFS)
In Depth first search, there is a simple rule. Start the search from the starting node and its next neighbor node. If the node is not found, go to the next neighbor node and check the neighbor of the second node. Repeat the process for other nodes until the node is found. And if there is a node with a neighbor we’ve already visited or no neighbor at all, we go back and try one of the neighbors we haven't visited last time. This process of getting back to the node is called backtracking.
This algorithm is called Depth First Search. A form of traversal algorithms is used to explore the graphs and provide solutions to many different problems such as finding the shortest path from one point to another point.
We keep track of all the visited nodes in a stack or a queue data structure. Whenever we visit a node, we push that node inside the visited node stack/queue.
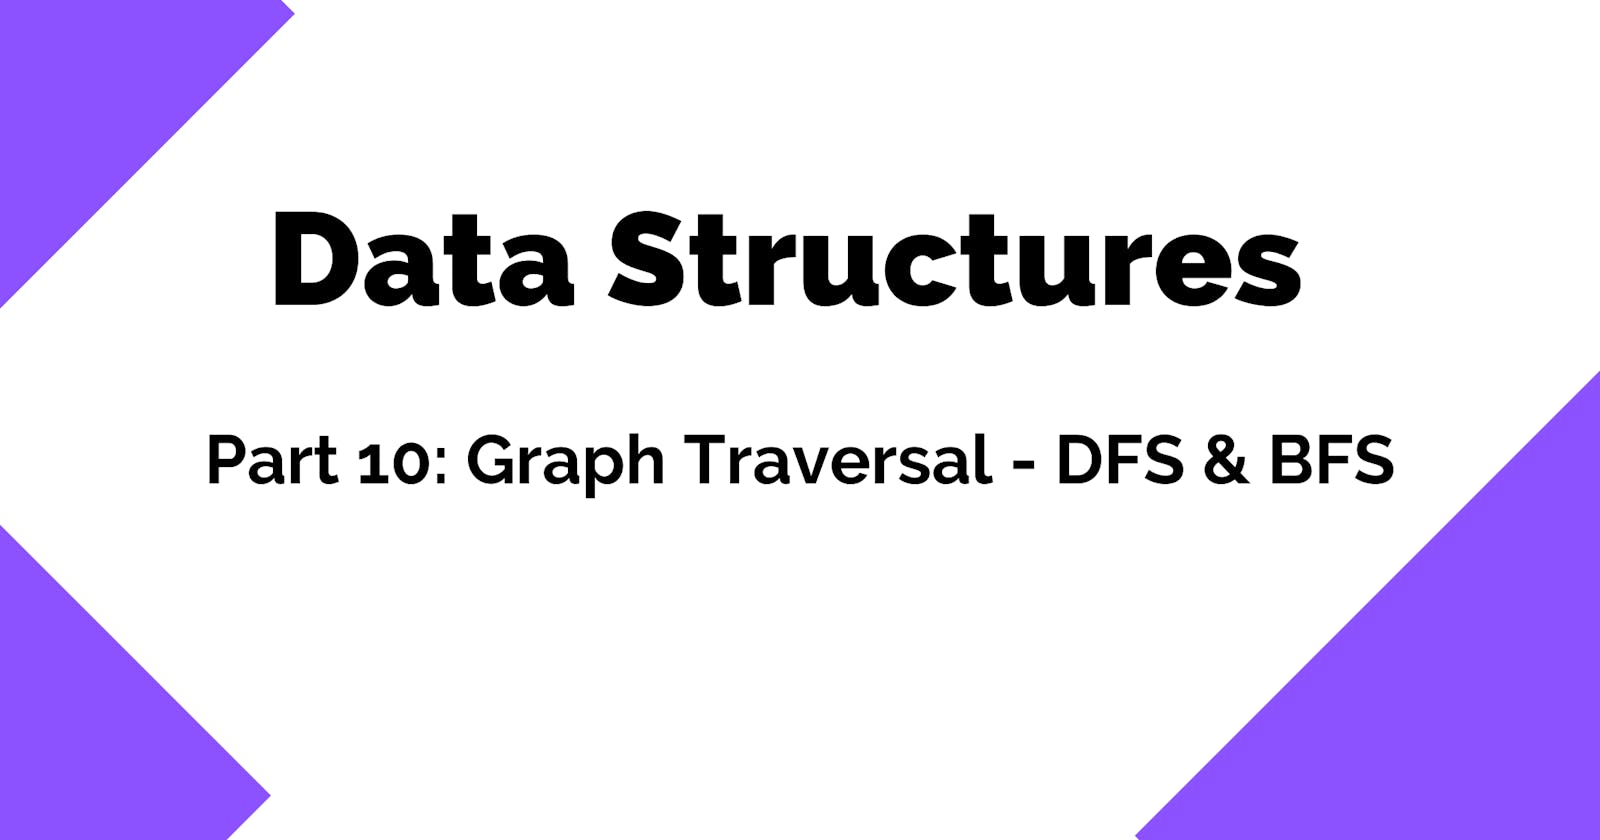
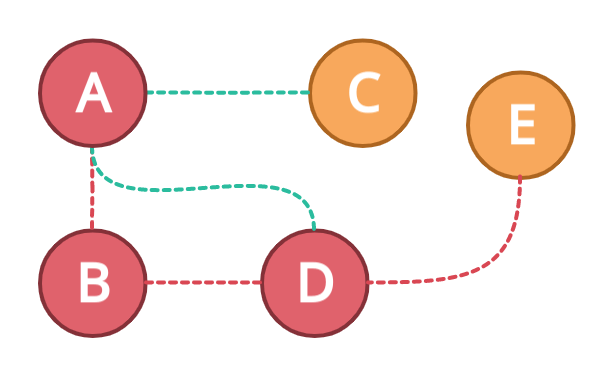
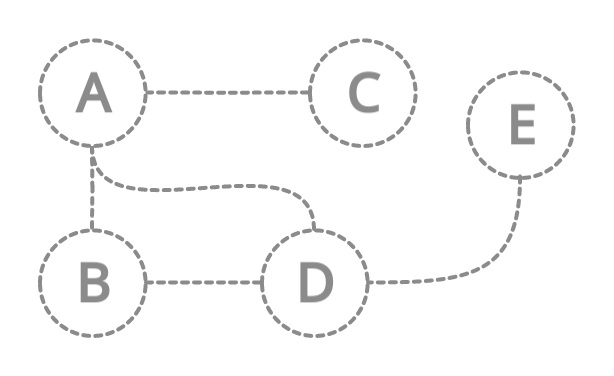
To understand this algorithm, we are going to use a simple graph.
In the above graph, we have a total of five nodes and it's of type undirected graph.
To understand the DFS, we will traverse this graph completely. We will start from the node A.
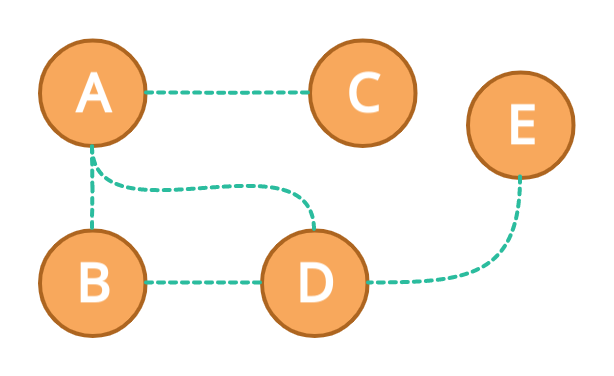
From the starting node A we will pick any arbitrary node from its neighbors B, C, and D. We can also follow the sorting order of alphabets to pick the next arbitrary node.
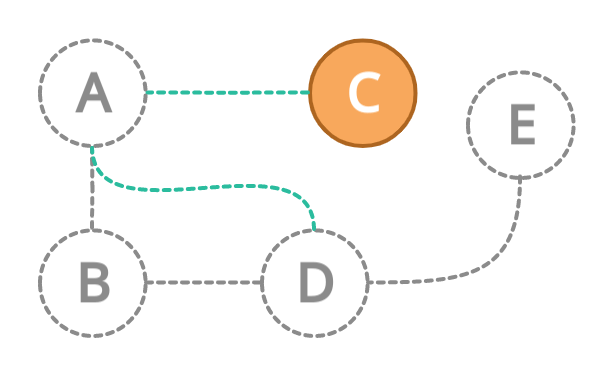
Let's say we have picked B as our next node, now we will move to B and mark the node A as visited.
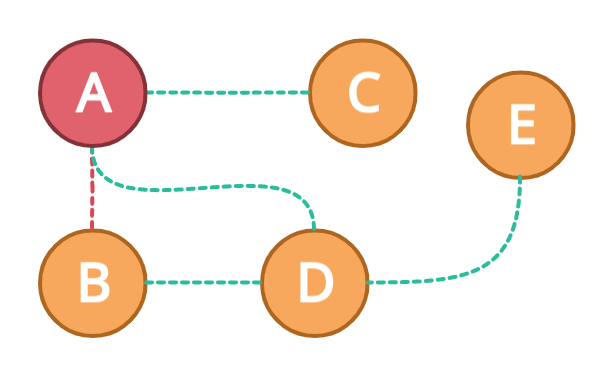
Next, we will find the next node again. B is only connected to D so our next node will be D. We will now mark the B node as a visited node.
Next, node D is connected to node E only, therefore, let's go to node E while marking the node D as visited.
Now node E is a node that has no other connections, now we have to backtrack. First, let's mark the node E as visited and see how we have traversed from node A to E.
Now you will understand why this algorithm is called Depth First Search. We are going in-depth while searching for the node.
✨ Backtracking
The node E does not have any neighbors. When a node doesn't have any neighbors we go back and try one of the neighbors we haven't visited last time. The process of getting back to the previous step is called backtracking. A famous term that you are going to see a lot in data structures.
In our case, we will backtrack from E to D. Since node D is already visited, we will backtrack again to the previous node. This time we will go to node B. The node B is already visited therefore again backtrack to the previous node A.
In the above diagram, the gray area is basically the backtracked nodes and edges.
Now, we are back at node A. We will check its neighbors which we haven't visited yet. We will go to neighbor D.

Since node D is already visited, we will again backtrack to A

Now, we have only one neighbor left for node A i.e C. Therefore it will move to node C and mark it as a visited node.
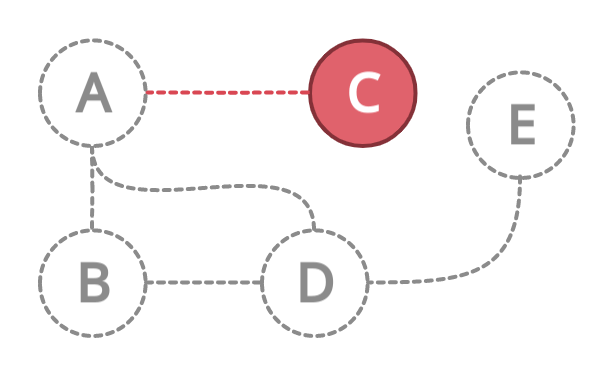
After visiting node C. This node again doesn't have any neighbor nodes. What we will do? We will again backtrack to the previous node that is A.
Congratulations! We have completely traversed the graph using Depth First Search Technique 🚀✨
✨ Coding DFS in JavaScript
In the previous post, we created the Graph class and implemented the graph using adjacency list. We added some basic operations to it. Now we will add another operation inside the class and name it dfs.
We are going to use a famous programming technique called Recursion for writing DFS.
I would highly recommend you to first practice recursion and watch What is recursion - In Depth to understand it better.
// initially, we have a new set called visited for tracking the visited nodes
dfs(start, visited = new Set()) {
  // add the start node to visited set.
  visited.add(start);
  // get all the neighbors of start node.
  const neighbors = this.list.get(start);
  if (neighbors) {
    // loop over all the neighbors
    for (const neighborNode of neighbors) {
      // check if the neighbor is already visited?
      if (!visited.has(neighborNode)) {
        // if the neighbor is not visited then
        // repeat the same process for the neighbor node
        this.dfs(neighborNode, visited);
      }
    }
  }
  // return the result
  return visited;
}
✨ Breadth First Search (BFS)
In Breath First Search, we perform the traversal on the layers of every node. By that means we explore all the neighbors of our starting node before exploring any other node. We mark the starting node as visited after we have explored all the neighbors. We then move to one of the neighbors of starting node and explore all the neighbors of that node. Then the third neighbor, and so on.
The primary difference between DFS and BFS is the order in which nodes are processed. In DFS, we process nodes in the depth of the graph, and in BFS, we first explore all the neighbors of starting node and then to the second neighbor and so on.
BFS has a lot of applications in finding the shortest path in an unweighted graph.
Let's implement the BFS in the following simple graph to understand how the nodes are traversed in BFS.
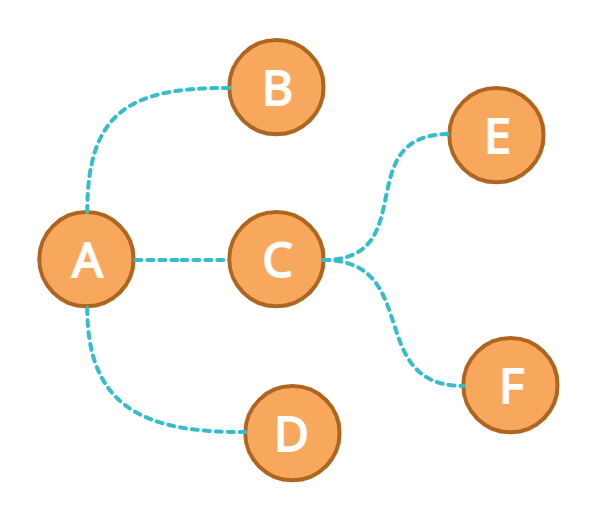
In the above graph, let's mark node A as a start node.
At first, we will mark the A as a visited node and move it to all of its neighbors and push them all into a queue.
Our Graph and Queue will look something like this:
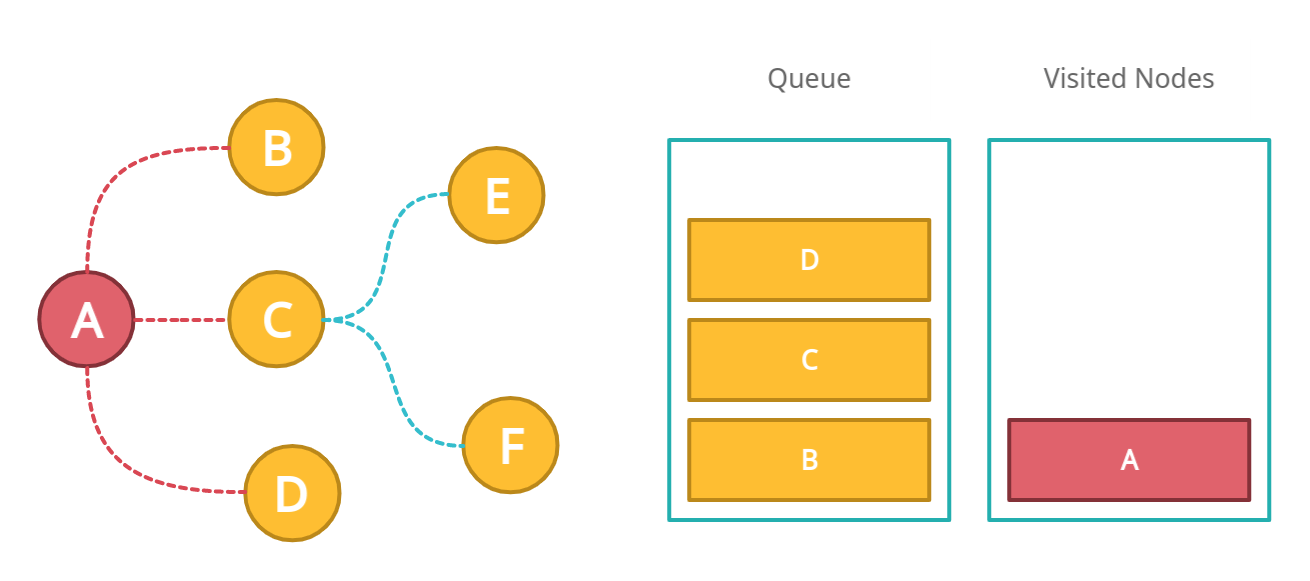
We have marked A as the visited node and have pushed all the neighbors of A into the queue.
Now we will move to the next element in the queue. We will pick the B node as the next item (FIFO). We will mark B as a visited node and then check if B has any neighbors? No. So we will not push anything new into the queue.

Next, we will move to the third item into the queue that is C. We will mark C as visited and again check if it has any neighbors? Yes. Therefore push all the neighbors of C into the queue.

Now we will check the next node in the queue that is D. Do we have any neighbors of D? No. Therefore mark it as visited and move to the next item in the queue.
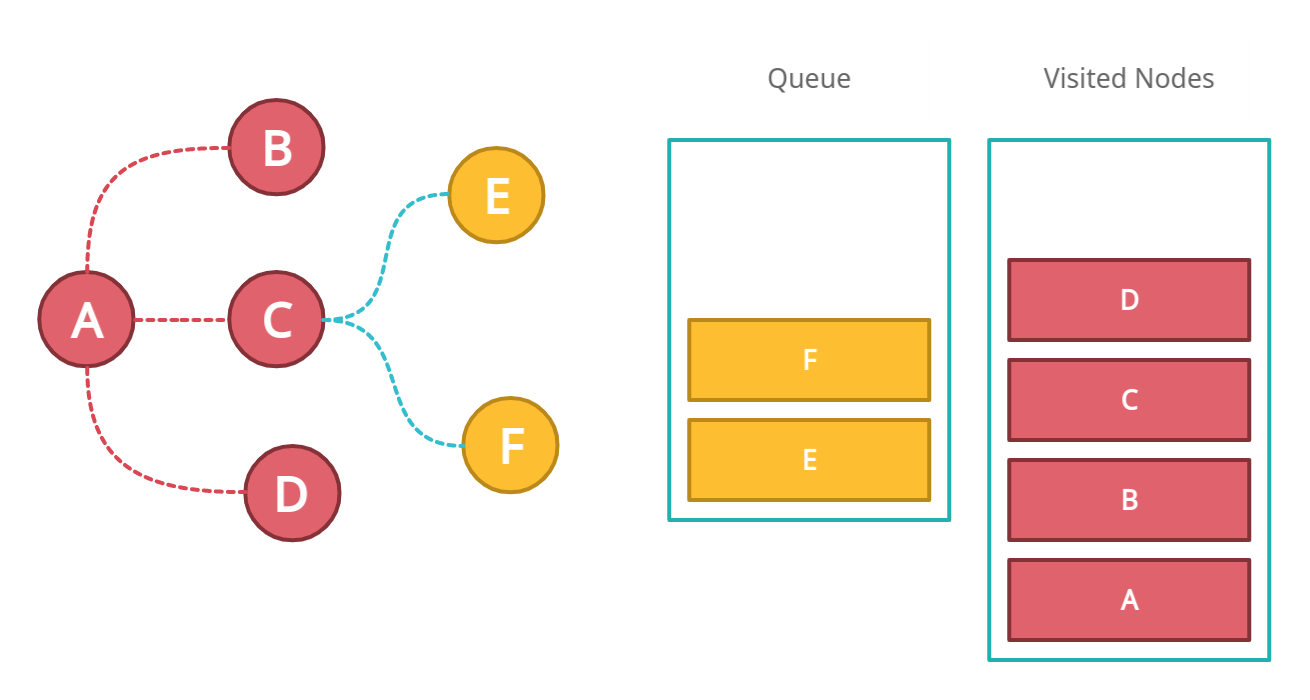
Now we have visited all the neighbors of A, we will check the remaining nodes on the queue.
We will repeat the same process for other nodes in the queue. The next two nodes in the queue are E and F. Both of them do not have any other neighbors. Therefore mark them visited one by one and remove them from the queue.
In the end, we will have an empty queue and all the nodes visited.
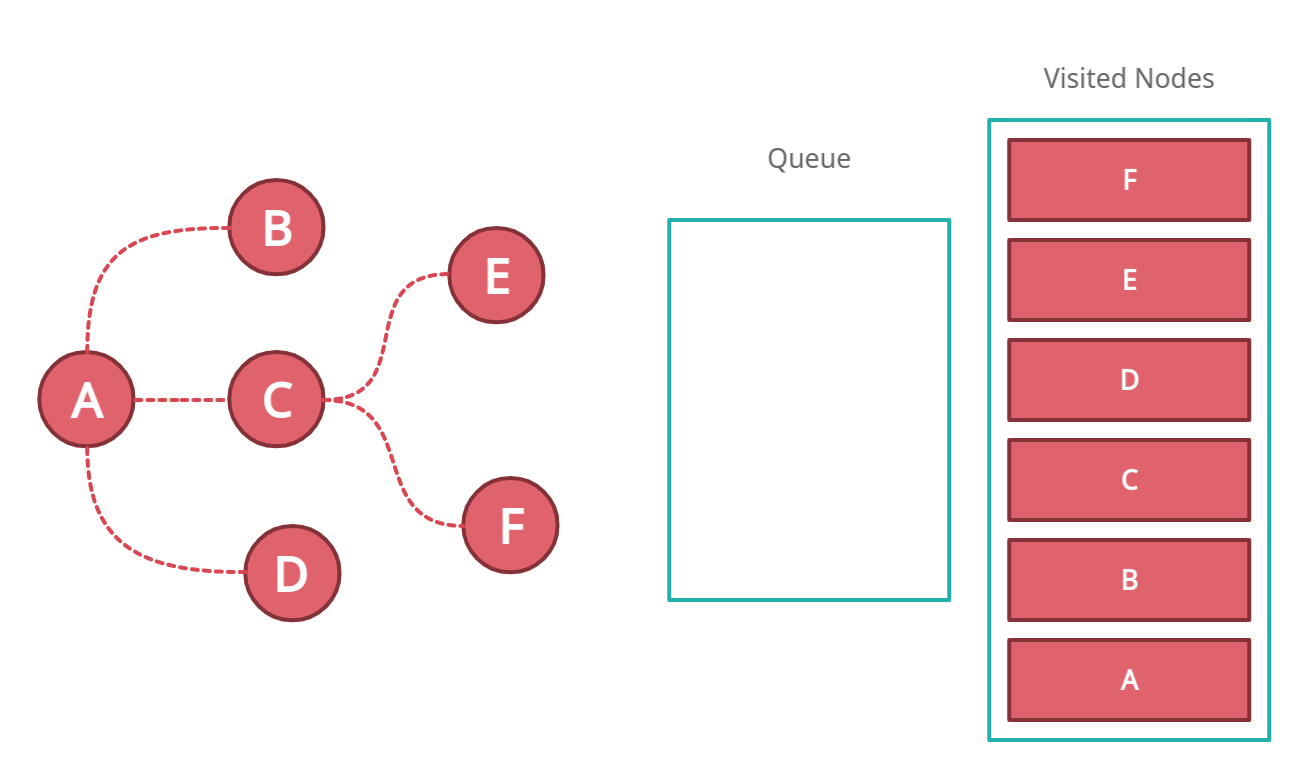
Congratulations! We have completely traversed the graph using Breadth First Search Technique 🚀✨
✨ Coding BFS In JavaScript
Now we will add another operation inside the Graph class and name it bfs.
bfs(start) {
  // create a new set for visited nodes.
  const visited = new Set();
  // add the start node as visited.
  visited.add(start);
  // create a new queue, and enqueue start into it.
  const queue = [start];
  while (queue.length > 0) {
    // dequeue the item from the queue
    const node = queue.shift();
    // find the neighbors of that node
    const neighbors = this.list.get(node);
    if (neighbors) {
      // loop over the neighbors
      for (const neighborNode of neighbors) {
        // if the node has not been visited then
        // push it to visited and add node to queue
        if (!visited.has(neighborNode)) {
          visited.add(neighborNode);
          queue.push(neighborNode);
        }
      }
    }
  }
  return visited;
}
You can create multiple complex graphs and test both techniques.
That's it, folks! hope it was a good read for you. Thank you! ✨