React Authentication Using New Firebase JS SDK
A complete guide for you to use the new JS SDK of Firebase for authentication in React.
Hello everyone, In this article, we are going to learn about Authentication in React using the new Firebase JS SDK.
Firebase has updated its JavaScript SDK recently. In the new release, they have introduced a new modular API, which enables tree-shaking, bundle size reduction, and other benefits.
The documentation is also updated concerning this new release. You can read the documentation of the firebase from here.
Project Details
We are going to build a simple application in which we will perform three basic operations
- Signup
- Login
- Logout
And as a bonus, we will also cover error handling and private routing for protecting the routes.
I have already created the UI for this project for you to use. Just clone the repository from here and switch to the ui-only branch.
Then, run npm i or yarn to install the dependencies. After the installation, run npm start or yarn start to start the development build.
After successfully starting the project, you will be able to see this screen:

Live Demo : fir-auth-18a81.web.app
Without any further delay, let's start!
Firebase Project Creation
You can create a free account or login into your existing account. After login, go to console and click New Project

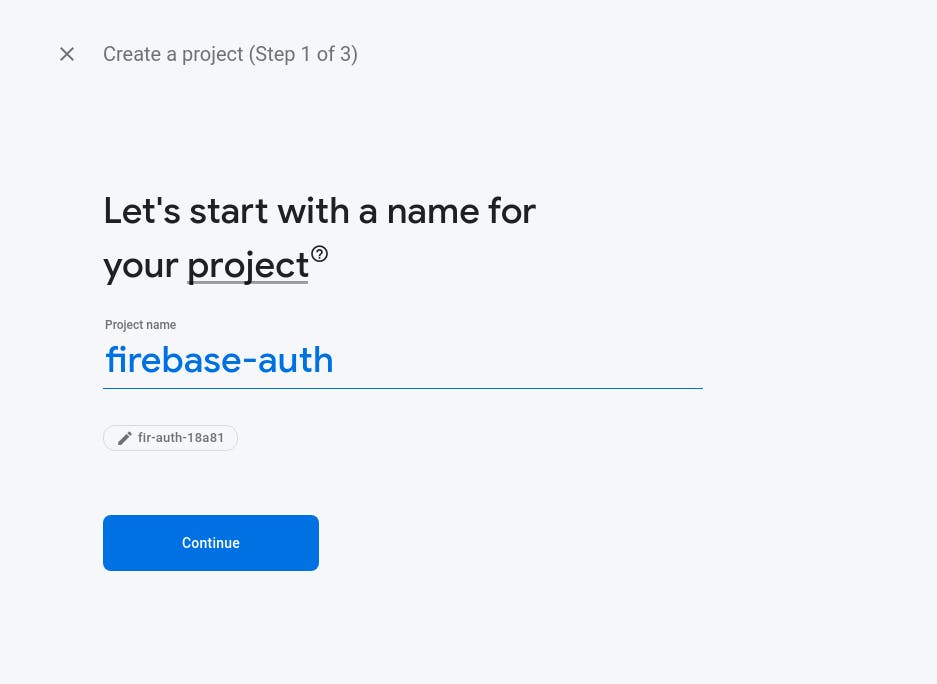
Write the name of your project according to your preference, and click continue.
On the next screen, firebase will ask if you want analytics or not. I don't want it therefore I haven't checked it. You can enable the analytics for your project from here.

After it, click create project button. It will take few seconds to create the project.
Firebase App Creation
Now that we have created the project, it's time to create an application inside the project.
Click the </> icon for creating a new web application inside your project.

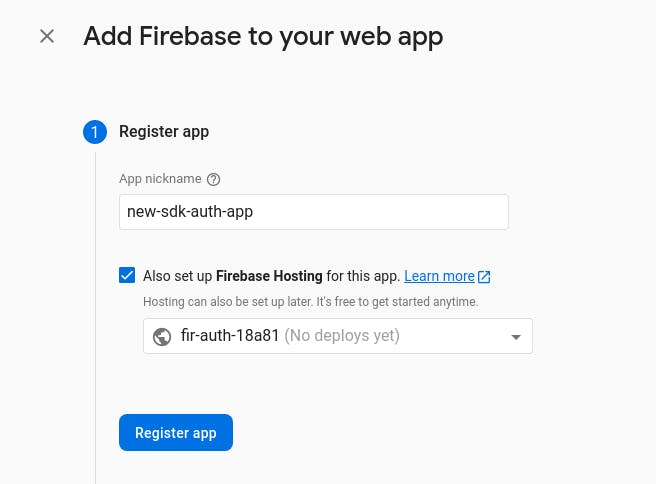
After clicking, a setup wizard will come and you will be asked to enter your application details

You can write the name of your app and register it. I have also enabled the hosting for it. You can choose whatever you want.
After it, firebase will generate a configuration for your application. Copy-paste the configuration somewhere for later use.
Continue with the next setup and complete the wizard.
Installing And Configuring Firebase With React
Now that we have the configuration credentials, we will create a .env.local file in our react project. We are doing it because we do not want to expose our firebase configurations to other people over the internet.
Inside the .env.local, we have to prefix every environment variable with REACT_APP_. Create React App will automatically pick it. If the REACT_APP_ prefix is not there, CRA will not pick it.
Inside
.env.local
REACT_APP_API_KEY=YOUR_API_KEY_HERE
REACT_APP_AUTH_DOMAIN=YOUR_AUTH_DOMAIN_HERE
REACT_APP_PROJECT_ID=YOUR_APP_PROJECT_ID_HERE
REACT_APP_STORAGE_BUCKET=YOUR_STORAGE_BUCKET_HERE
REACT_APP_MESSAGING_SENDER_ID=YOUR_MESSAGING_SENDER_ID_HERE
REACT_APP_APP_ID=YOUR_APP_ID_HERE
Restart the local react server for CRA to pick all these variables.
After it, Let's install firebase now.
yarn add firebase
or
npm i firebase
After installing firebase, we will create the firebase-config.js file at the root of our project inside the src directory for configuring our firebase for our react app.
Inside
src/firebase-config.js
import { initializeApp } from 'firebase/app'

const firebaseConfig = {
  apiKey: process.env.REACT_APP_API_KEY,
  authDomain: process.env.REACT_APP_AUTH_DOMAIN,
  projectId: process.env.REACT_APP_PROJECT_ID,
  storageBucket: process.env.REACT_APP_STORAGE_BUCKET,
  messagingSenderId: process.env.REACT_APP_MESSAGING_SENDER_ID,
  appId: process.env.REACT_APP_APP_ID
}

initializeApp(firebaseConfig)
Now we will load this file inside src/index.js
import React from 'react'
import ReactDOM from 'react-dom'

// load the firebase configuration here
import './fireabse-config'

import App from './App'

// ... rest code here ...
This will load the Firebase configuration in our application and will connect our app to the firebase.
Let's move forward with the authentication now!
Signup
Inside the pages directory, we have a file called Signup.js where all of the UI is ready with form handling. On clicking the Signup button, the form will trigger the submit event, and the signupUser function will be called. We will write all the logic inside this function for signup.
We need two methods from the new Firebase SDK
- getAuth
- createUserWithEmailAndPassword
Inside
src/pages/Signup.js
import { getAuth, createUserWithEmailAndPassword } from 'firebase/auth'
Now, in the signupUser function:
const signupUser = async (e) => {
  e.preventDefault()
  // start loading..
  setLoading(true)
  try {
    // get the auth instance
    const auth = getAuth()
    // create user on firebase with email and password and pass the auth instance to it.
    await createUserWithEmailAndPassword(auth, email, password)
    // on successful creation, navigate to home page.
    history.push('/home')
  } catch (err) {
    console.log('You have got an error: ', err.code)
  } finally {
    // stop loading.
    setLoading(false)
  }
}
Congratulations, We have signup ready! But there is one improvement that we can do in order to improve the quality of code and reusability.
We can extract the logic for creating the auth instance and createUserWithEmailAndPassword to separate hook. We can call it useFirebaseAuth.
We will write all the authentication logic inside this hook and expose a simple API for our components to use.
Writing A Custom Hook For Firebase Auth Logic
Create another folder inside the src directory and name it hooks and create a new file useFirebaseAuth.js inside it.
src/hooks/useFirebaseAuth.js:
import { createUserWithEmailAndPassword, getAuth } from 'firebase/auth'

// create a global instance for all the methods of authentication
const auth = getAuth()

export const useFirebaseAuth = () => {
  // signup method
  const signUpWithEmailAndPassword = (email, password) => {
    return createUserWithEmailAndPassword(auth, email, password)
  }

  return {
    signUpWithEmailAndPassword
  }
}
Now, we can use this hook inside our Signup.js without creating auth instance.
src/pages/Signup.js:
import { useFirebaseAuth } from '../hooks/useFirebaseAuth'

// inside the component
const { signUpWithEmailAndPassword } = useFirebaseAuth()

const signupUser = async (e) => {
  e.preventDefault()
  setLoading(true)
  try {
    await signUpWithEmailAndPassword(email, password)
    history.push('/home')
  } catch (err) {
    console.log('You have got an error: ', err.code)
  } finally {
    setLoading(false)
  }
}
SignIn
Inside the pages directory, we have the Login.js. Inside this file, we have a simple UI for the login screen. When the user will click the Login button, the form will trigger a submit event and loginUser will be called. We can write the login logic inside this function.
First, let's create another method in our useFirebaseAuth hook for signing.
src/hooks/useFirebaseAuth.js:
import {
  getAuth,
  createUserWithEmailAndPassword,
  signInWithEmailAndPassword as signInWithEmailAndPassword_
} from 'firebase/auth'

// create a global instance for all the methods of authentication
const auth = getAuth()

export const useFirebaseAuth = () => {
  // signup method
  const signUpWithEmailAndPassword = (email, password) => {
    return createUserWithEmailAndPassword(auth, email, password)
  }

  // signIn method
  const signInInWithEmailAndPassword = (email, password) => {
    return signInWithEmailAndPassword_(auth, email, password)
  }

  return {
    signUpWithEmailAndPassword,
    signInInWithEmailAndPassword
  }
}
We have signInInWithEmailAndPassword for login, let's use it inside of our Login component.
src/pages/Login.js
const { signInInWithEmailAndPassword } = useFirebaseAuth()

const loginUser = async (e) => {
  e.preventDefault()
  // start loading..
  setLoading(true)
  try {
    // login user with email and password
    await signInInWithEmailAndPassword(email, password)
    //  on successful creation, navigate to home page.
    history.push('/home')
  } catch (err) {
    console.log('You have got an error: ', err.code)
  } finally {
    // stop loading..
    setLoading(false)
  }
}
Congratulations, we have both signup and login functionalities in place now. Let's write our last auth functionality i.e logout.
Logout
We will again create another method inside the useFirebaseAuth hook for logout.
src/hooks/useFirebaseAuth.js
import {
  getAuth,
  createUserWithEmailAndPassword,
  signInWithEmailAndPassword as signInWithEmailAndPassword_,
  signOut
} from 'firebase/auth'

// create a global instance for all the methods of authentication
const auth = getAuth()

export const useFirebaseAuth = () => {
  // ... rest code ... //

  // logout method
  const logout = () => {
    return signOut(auth)
  }

  return {
    signUpWithEmailAndPassword,
    signInInWithEmailAndPassword,
    logout
  }
}
Now, inside the src/pages/Home.js, we have a simple Logout button.
// .. rest code .. //

const { logout } = useFirebaseAuth()

const logoutUser = async () => {
  try {
    // call the logout method.
    await logout()
    // after success, push the user to the main screen
    history.push('/')
  } catch (err) {
    console.log('You have got an error: ', err)
  }
}

// jsx
;<Button mt='10' onClick={logoutUser}>
  Logout
</Button>
We have the three basic functionalities of authentication ready. I would still encourage you to read the next bonus sections for a better experience. And how Firebase facilitates us in managing the authentication state over the application.
Bonus: Error Handling
Firebase provides us much better errors if anything went wrong. We have two major properties in the error object.
- error.message
- error. code
import { getAuth, createUserWithEmailAndPassword } from 'firebase/auth'

const auth = getAuth()

createUserWithEmailAndPassword(auth, email, password)
  .then((userCredential) => {
    // Signed in
    const user = userCredential.user
    // ... rest code ..//
  })
  .catch((error) => {
    const errorCode = error.code
    const errorMessage = error.message
    // ..
  })
we can use both properties to handle the errors. I'll use the code method for detecting the errors and will display my custom messages.
First, let's create a new component ErrorDialog for presenting the errors. Let's create a new file inside the src/components/ErrorDialog.js
import {
  Modal,
  ModalOverlay,
  ModalContent,
  ModalHeader,
  ModalFooter,
  ModalBody,
  ModalCloseButton,
  Text
} from '@chakra-ui/react'

export default function ErrorDialog({ errorMessage, onClose }) {
  return (
    <Modal isOpen={true} onClose={onClose}>
      <ModalOverlay />
      <ModalContent>
        <ModalHeader>Oops..</ModalHeader>
        <ModalCloseButton />
        <ModalBody>
          <Text>{errorMessage}</Text>
        </ModalBody>
        <ModalFooter></ModalFooter>
      </ModalContent>
    </Modal>
  )
}
Signup Error Handling
We will create a new state errorMessage in which we will set our own custom error message.
Let's update the signupUser method to catch errors
src/pages/Singup.js
const [errorMessage, setErrorMessage] = useState('')

const signupUser = async (e) => {
  e.preventDefault()
  setLoading(true)
  try {
    await signUpWithEmailAndPassword(email, password)
    history.push('/home')
  } catch (err) {
    console.log('You have got an error: ', err.code)
    // email already in use error handling...
    if (err.code === 'auth/email-already-in-use') {
      setErrorMessage(
        'Sorry, This Email is already in use with another account.'
      )
    }
    // mode cases here...
  } finally {
    setLoading(false)
  }
}

const onCloseErrorDialog = () => {
  setErrorMessage('')
}

// .. rest code .. //
// jsx
{
  errorMessage && (
    <ErrorDialog errorMessage={errorMessage} onClose={onCloseErrorDialog} />
  )
}
Login Error Handling
Let's do the same in the Login.js.
src/pages/Login.js
const [errorMessage, setErrorMessage] = useState('')

const loginUser = async (e) => {
  e.preventDefault()
  setLoading(true)
  try {
    await signInInWithEmailAndPassword(email, password)
    history.push('/home')
  } catch (err) {
    // wrong password handling..
    if (err.code === 'auth/wrong-password') {
      setErrorMessage('You have entered wrong password. Please try again!')
    } else if (err.code === 'auth/user-not-found') {
      // user not found handling..
      setErrorMessage(
        'The email you have provided is not registered yet. Create a new account and login. Thanks!'
      )
      // more use cases here
    }
  } finally {
    setLoading(false)
  }
}
Bonus: Private Routes
Let's say we do not want our Home screen to be accessed by any unauthenticated user. We have to protect it and only allow the authenticated users to see it.
To implement this feature, first, we have to get the authentication state of the user either it's logged in or logged out.
For getting the authentication state, firebase provides us a listener called onAuthStateChanged. This listener is automatically called whenever the user is logged in or logged out.
import { getAuth, onAuthStateChanged } from 'firebase/auth'

const auth = getAuth()

onAuthStateChanged(auth, (user) => {
  if (user) {
    // User is signed in, see docs for a list of available properties
    // https://firebase.google.com/docs/reference/js/firebase.User
    const uid = user.uid
    // ... rest code ... //
  } else {
    // User is signed out
    // ... rest code ... //
  }
})
We will use this listener in our useFirebaseAuth hook. We will register this hook once when the application is loaded and track the state.
src/hooks/useFirebaseAuth.js
import {
  getAuth,
  signOut,
  onAuthStateChanged,
  createUserWithEmailAndPassword,
  signInWithEmailAndPassword as signInWithEmailAndPassword_
} from 'firebase/auth'
import { useEffect, useState } from 'react'

const auth = getAuth()

export const useFirebaseAuth = () => {
  // create new state for checking if the user is authenticated or not.
  const [authenticated, setAuthenticated] = useState()
  // create a new state for storing user data.
  const [user, setUser] = useState(null)

  // run only once when the component is mounted.
  useEffect(() => {
    const unsubscribe = onAuthStateChanged(auth, (user) => {
      // if user is authenticated
      if (user) {
        setAuthenticated(true)
        setUser(user)
      } else {
        setAuthenticated(false)
        setUser(false)
      }
    })
    // remove the listener when the component is unmounted. Otherwise a memory leak :p
    return unsubscribe
  }, [])

  // rest code here ..
  return {
    authenticated,
    user
    //.. rest code .. //
  }
}
Now we can implement the PrivateRoute component with the help of our useFirebaseAuth hook.
Inside
src/routes.jsfile:
import { BrowserRouter, Route, Redirect } from 'react-router-dom'
import { Container } from '@chakra-ui/react'

import { useFirebaseAuth } from './hooks/useFirebaseAuth'
import Login from './pages/Login'
import Signup from './pages/Signup'
import Home from './pages/Home'

const PrivateRoute = ({ children }) => {
  const { authenticated } = useFirebaseAuth()
  // if the user is authenticated, then return the children (Home Component)
  if (authenticated) {
    return children
  }
  // otherwise, Redirect component with redirection to /
  return <Redirect to='/' />
}

export default function ApplicationRoutes() {
  return (
    <BrowserRouter>
      <Container>
        <Route path='/' exact>
          <Signup />
        </Route>
        <Route path='/login' exact>
          <Login />
        </Route>
        <PrivateRoute path='/home' exact>
          <Home />
        </PrivateRoute>
      </Container>
    </BrowserRouter>
  )
}
That's it! We have covered almost everything that you need to bootstrap your authentication with React using the Firebase Authentication service. I hope this article was a good read for you and you learned something new today.
Repository URL: github.com/rehan-sattar/firebase-auth-sdk-9
If you like my work, please do support me with reacting, commenting, and sharing this article.
Thank you so much, everyone!

